express
- 安装express 脚手架 工具 快速搭建项目
yarn global add express-generator或
npm install express-generator -gexpress --version #查看是否安装成功- express 项目初始化
express 项目名yarn 或者 npm install #安装所有三方包yarn start #启动项目 启动后默认打开3000端口node 热部署
需要安装 nodemon
npm install nodemon -g
nodemon  -v
在package.json 改变启动命令

项目的目录结构分析
shop
├── bin
│   └── www
├── public      			#静态资源文件
│   ├── images
│   ├── javascripts
│   └── stylesheets
│       └── style.css
├── routes                  #路由 模块
│   ├── index.js
│   └── users.js
├── views					#页面
│   ├── error.jade
│   ├── index.jade
│   └── layout.jade
├── app.js                  #主模块  入口文件
└── package.json            #项目依赖
2. 配置数据库连接
需要用到 三方包 mysql
npm i mysql新建 db 文件 在db文件下新建 db.js 完成 数据库的连接
const mysql = require('mysql')

const db = mysql.createPool({
  host: '127.0.0.1',
  user: 'root',
  password: '123456',
  database: 'news' // 数据库名字
})

module.exports = db // 导出执行sql语句
3. 路由模块的配置
const express = require('express'); // 导入express模块
const router = express.Router();  // 使用路由
const db = require('../../db/db');


module.exports = router;// 导出router实例 将在app.js 导入使用
get请求
router.get('/接口地址',(req,res, next) => {
    // 可以利用 req.query 获取前端传过来的参数
    const sql = `select * from sys_user where F_Id = ?`; // sql语句
  db.query(sql, req.auth.F_CreatorUserId, (err, result) => { // result 执行sql语句结果
    if (err) return res.cc(0, '查询失败');
    if (result.length !== 1) return res.cc(0, '查询失败');
    const userData = {
      username: result[0].F_Account,
      name: result[0].F_ReaName,
      gender: result[0].F_Gender,
      age: result[0].F_Birthday,
      phone: result[0].F_MobilePhone,
      email: result[0].F_Email,
      description: result[0].F_Description
    }
    res.send(200, '查询成功', userData) // 返回前端
  })
})
post 请求
router.post('/接口地址',(req,res, next) => {
    // 可以利用 req.query 获取前端传过来的参数
    const sql = `select * from sys_user where F_Id = ?`; // sql语句
  db.query(sql, req.auth.F_CreatorUserId, (err, result) => { // result 执行sql语句结果
    if (err) return res.cc(0, '查询失败');
    if (result.length !== 1) return res.cc(0, '查询失败');
    const userData = {
      username: result[0].F_Account,
      name: result[0].F_ReaName,
      gender: result[0].F_Gender,
      age: result[0].F_Birthday,
      phone: result[0].F_MobilePhone,
      email: result[0].F_Email,
      description: result[0].F_Description
    }
    res.send(200, '查询成功', userData) // 返回前端
  })
})
app.js 导入使用
var express = require('express');

var app = express();

let userRouter = require('./routes/admin/users'); // 导入路由
app.use('/user',userRouter) // 注入路由


app.listen(9999, () => { // 启动服务执行
  console.log('http://127.0.0.1:9999')

})
4. 跨域问题配置
需要利用到 第三方 中间件 cors
yarn add cors在路由注入之前配置
app.use(cors())单独自行配置请求头
//设置允许跨域访问该服务.
//  app.all('*', ...) 匹配所有HTTP请求方法(GET、POST等)和所有请求路径('*'表示通配符)
app.all('*', function (req, res, next) {
  res.header('Access-Control-Allow-Origin', '*'); // 设置跨域请求头 *允许任何域的客户端发起跨域请求
  res.header('Access-Control-Allow-Headers', 'Content-Type'); // 允许的请求头 允许客户端在请求中携带Content-Type头。
  res.header('Access-Control-Allow-Methods', '*'); // 允许的HTTP方法 允许所有HTTP方法(GET、POST、PUT等)
  res.header('Content-Type', 'application/json;charset=utf-8'); // 默认响应内容类型 设置响应头的默认内容类型为JSON格式,并指定字符编码为UTF-8
  next();
});
5. 文件上传
需要用到 multer 三方中间件
npm i multer导入
const multer = require("multer");
const path = require("path");
配置存储引擎
配置文件的存放地址
保证文件名字的唯一性
const storage = multer.diskStorage({
  destination: (req, file, cb) => {
    cb(null, path.join(__dirname, '../uploads'); // 保存到服务器本地的目录
  },
  filename: (req, file, cb) => { // 保证文件的唯一性
    // 生成唯一文件名:时间戳+随机数+后缀
    const uniqueName = Date.now() + "-" + Math.round(Math.random() * 1e9) + path.extname(file.originalname);
    cb(null, uniqueName);
  }
});
文件类型过滤
限制文件的大小
限制文件的文件格式
const fileFilter = (req, file, cb) => {
  const allowedTypes = ["image/jpeg", "image/png", "image/gif"];
  if (allowedTypes.includes(file.mimetype)) {
    cb(null, true);
  } else {
    cb(new Error("仅支持 JPEG/PNG/GIF 格式"), false);
  }
};

const upload = multer({
  storage: storage,
  limits: { fileSize: 5 * 1024 * 1024 }, // 限制5MB
  fileFilter: fileFilter
});
接口中使用
// 上传接口
app.post("/upload", upload.single("image"), (req, res) => { // 上传路径 /upload/image
  if (!req.file) {
    return res.status(400).json({ error: "未选择文件" });
  }
  // 返回文件访问路径
  res.json({
    url: `http://localhost:3000/uploads/${req.file.filename}`
  });
});
静态文件托管
前端要想可以下载文件资源 需要配置静态文件的托管
在路由之前
app.use('/uploads', express.static(path.join(__dirname, 'uploads')));
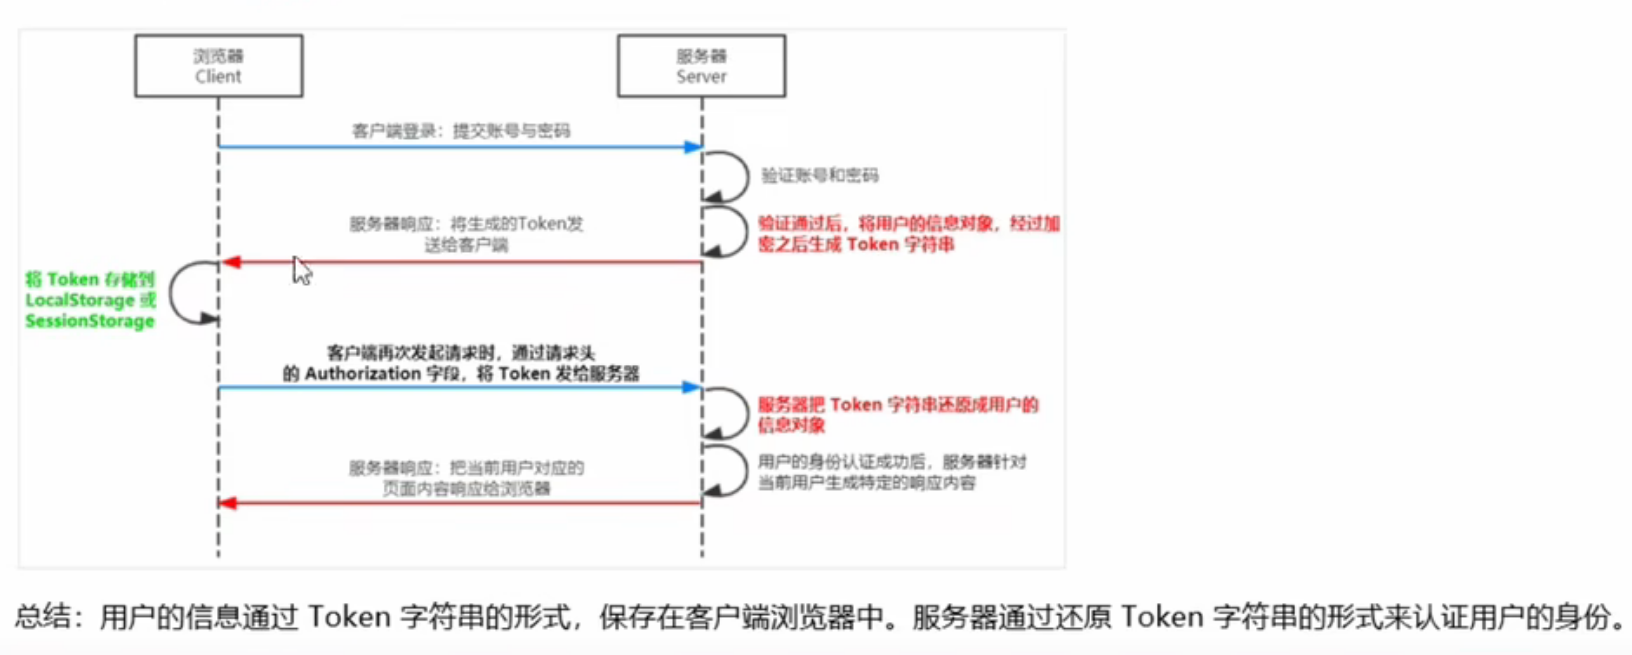
6. JWT 身份认证
JWT中token组成部分 分别是 Header(头部)、Payload(有效荷载)、Signature(签名)。
JWT 的三个组成部分,从前到后分别是 Header、Payload、Signature。
其中:
Payload 部分才是真正的用户信息,它是用户信息经过加密之后生成的字符串。
Header 和 Signature 是安全性相关的部分,只是为了保证 Token 的安全性。
jwt的认证过程

安装
npm i jsonwebtoken express-jwtjsonwebtoken 用于生成JWT 字符串
express-jwt用于将JWT 字符串解析还原成 JSON 对象
导入
const jwt = require('jsonwebtoken') const expressJWT = require('express-jwt')定义定义 secret 密钥
为了保证JWT 字符串的安全性 防止JWT 在网络 传输中被别人破解,需要定义一个用于加密和解密的secret秘钥
// 秘钥
module.exports = {
  jwtSecretKey: 'zhihuicow No1. ^_^', // 秘钥可以执行书写
  expiresIn: '4h' // token生效时间
}
生成token
需要把用户信息放入到其中 当用户传回token可以获取用户信息 通过req.auth获取
// 把敏感信息去除
    const user = { ...result[0], F_AdminPassword: '' }
    const tokenStr = jwt.sign(user, config.jwtSecretKey, { expiresIn: config.expiresIn })// config.jwtSecretKey 秘钥  user 用户信息  但三个参数是一些配置对象
    const data = {id:result[0].F_CreatorUserId, token: 'Bearer ' + tokenStr }
解析用户传回来的token
在这个可以进行拦截 可以不携带token 不放行接口
// 用这个包来解析 Token 字符串
const expressJWT = require('express-jwt')
// 路由之前解析token
// 使用 .unless({ path: [/^\/api\//] }) 指定哪些接口不需要进行 Token 的身份认证
app.use(expressJWT({ secret: config.jwtSecretKey, algorithms: ["HS256"] }).unless({
  path: [
     "/user/login",      // 精确匹配 /user/login
    "/user/captcha",
    "/liveStock/public/imgUpload",
    /^\/home\/.*/,
    /^\/manageLeft\/.*/,
    /^\/manageRight\/.*/,
    /^\/map\/.*/,
    /^\/trace\/.*/,
    /^\/weappUser\/.*/,
    /^\/upload\/.*/,
    /^\/file\/.*/,
  ]
}))
7. svg图形验证码生成
使用 svg-captcha 中间件
// 验证吗
const svgCaptcha = require('svg-captcha');